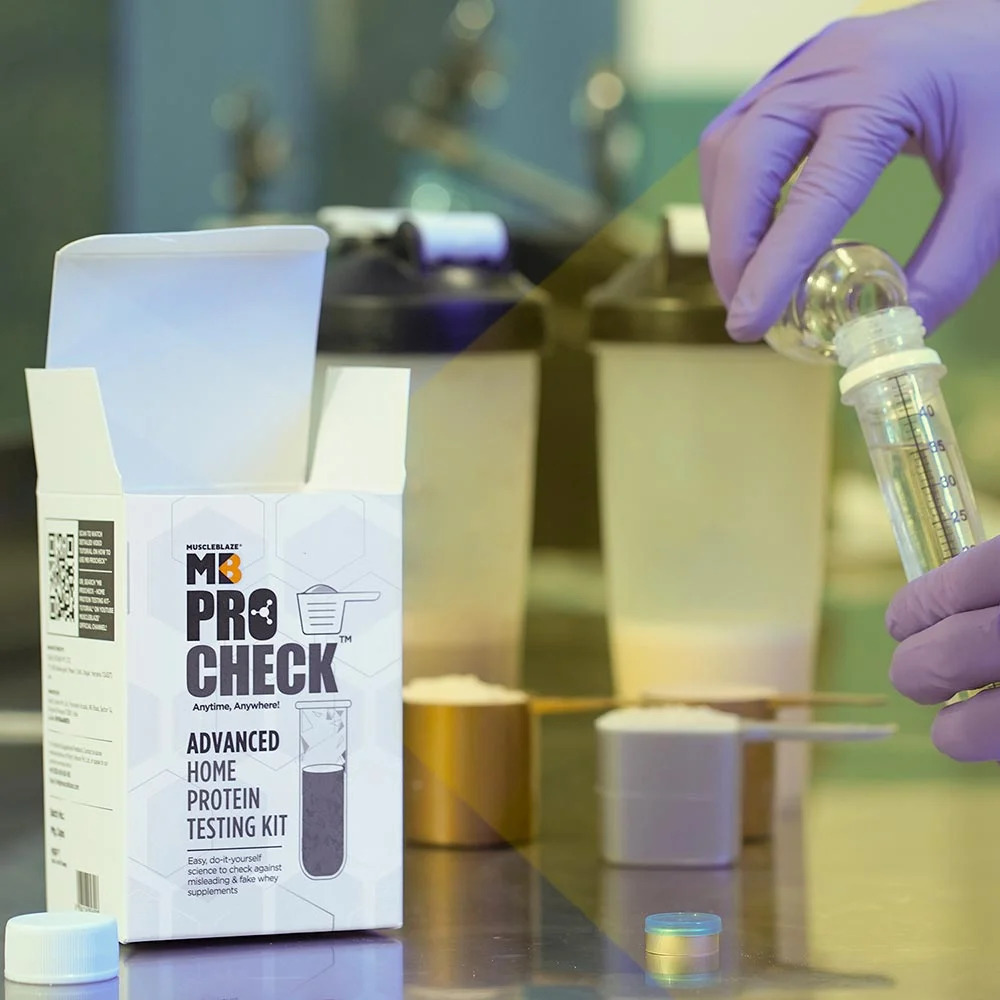
Why MuscleBlaze ProCheck ?
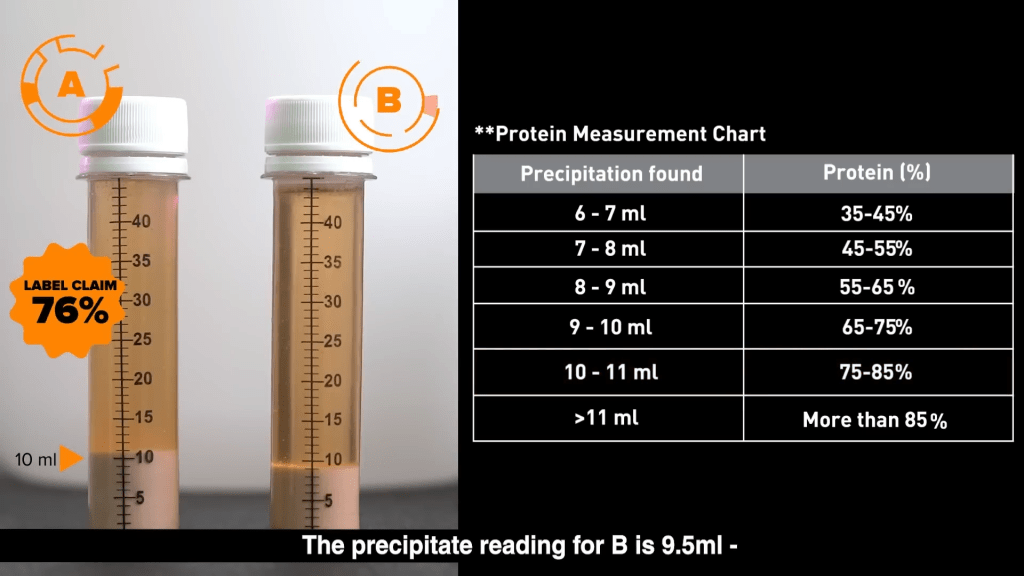
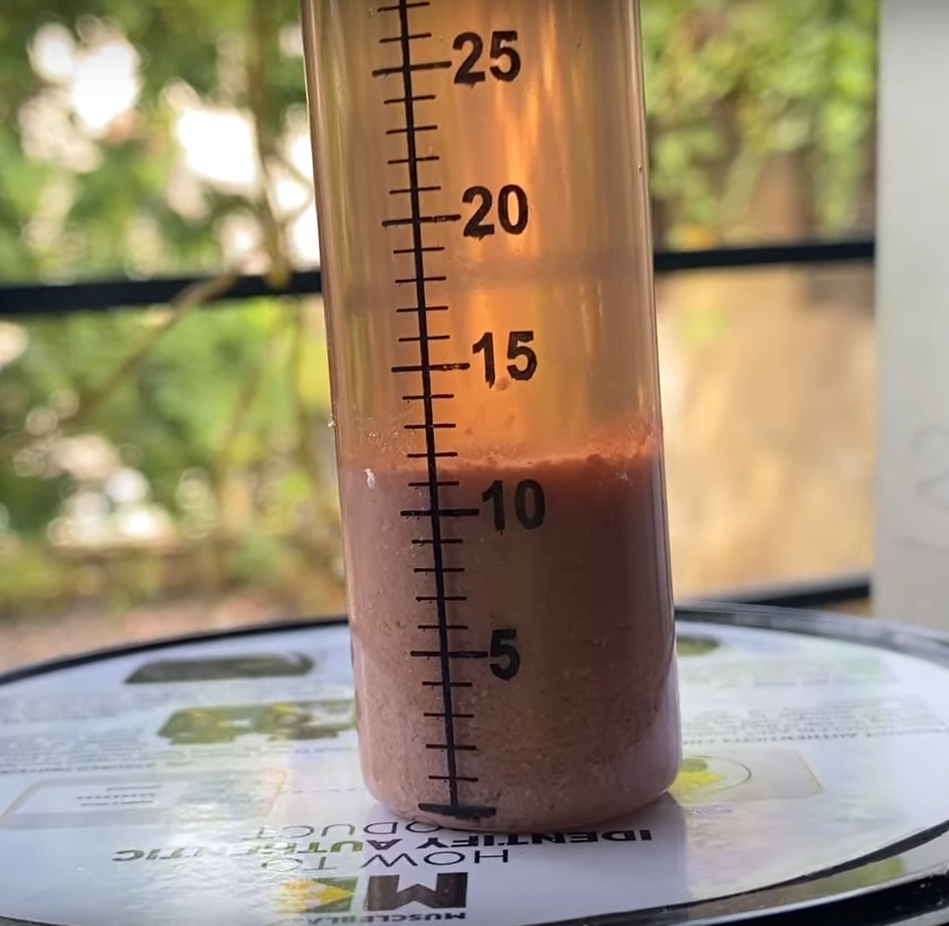
Authenticity is at our core and we live by it. One of the problems that we had at our end that we wanted to give the power to our consumers so that they can test the authenticity of any Whey Protein supplement and see the actual protein content vs what the brand is claiming about. MuscleBlaze ProCheck is the World’s First Home Protein Testing Kit. You can use this DIY kit to check against both fake & misleading whey protein supplements. On mixing 10 ml protein shake with 35 ml testing solution (provided in the kit) in a test tube, you can observe the formation of chemical precipitate within 24 hours. The amount of precipitate formed (in ml) determines the actual protein percentage present in the protein supplement as depicted by the below table:
We wanted to enhance the experience of consumer when finding out the protein content once precipitation is done without going to the above table manually. This is where we started building the computer vision based approach to find out the content of protein right from test tube precipitation using AI with phone camera itself.
This was not a straightforward approach as there were no ready-made available datasets to identify the test tube and read the precipitation. Let’s get started on how we took a plunge and made this solution viable to reinforce the Authenticity solution for our consumers.
First Approach – OpenCV based processing
Our first hit was Computer Vision. It had to be Computer Vision. It is pure instinct to lean towards Computer Vision when it’s about images. Leveraging OpenCV algorithms, we embarked on determining the amount of precipitate within the test tube. To achieve this, our first step was to establish a clear upper boundary of the precipitate content in the image. We employed Gaussian Blur to reduce noise and the Canny Edge algorithm to highlighting edges and boundaries. However, this proved to be a challenging endeavor. Despite our efforts, we struggled to obtain distinct edges, and the highlighted lines fell short of our expectations. To address this issue, we introduced a rectangular kernel and applied one of the Morphological Transformations i.e. MORPH_DILATE to the output image obtained from the Canny Edge algorithm. The below image shows morphologically transformed image:

Why we dropped this approach?
Looks good, right? While the current approach addresses some aspects of the problem, there are still two critical challenges to overcome. The first issue lies in the lack of generalizability – the parameters used for Canny Edge detection may perform well for specific images but fail to deliver consistent results across varying conditions. This undermines the robustness of the solution, particularly for real-time applications where images captured by users can exhibit significant variability.
Secondly, in many cases the upper boundary of the precipitate content is often not a perfect straight line, and so we had to find a way for accurate upper boundary extrapolation. Attempting to address this by further cutting the image from the upper boundary and then establishing a correlation between pixel height and volume (X Pixels = Y ml) proved to be overly complex and prone to uncertainty. Even minor inaccuracies in edge detection or cutting could lead to substantial errors, which is unacceptable given the need for high accuracy in this application. The first problem was a serious one since real-time images clicked by the user will be very dynamic in all considerable terms and we absolutely needed a Generalized equation which seemed impossible at that moment. Nothing is impossible though; we are just some neurons away from grasping and devising what we intend to.
While these challenges in mind, we looked out towards other technologies that might prove useful.
Second Approach – Mask R-CNN
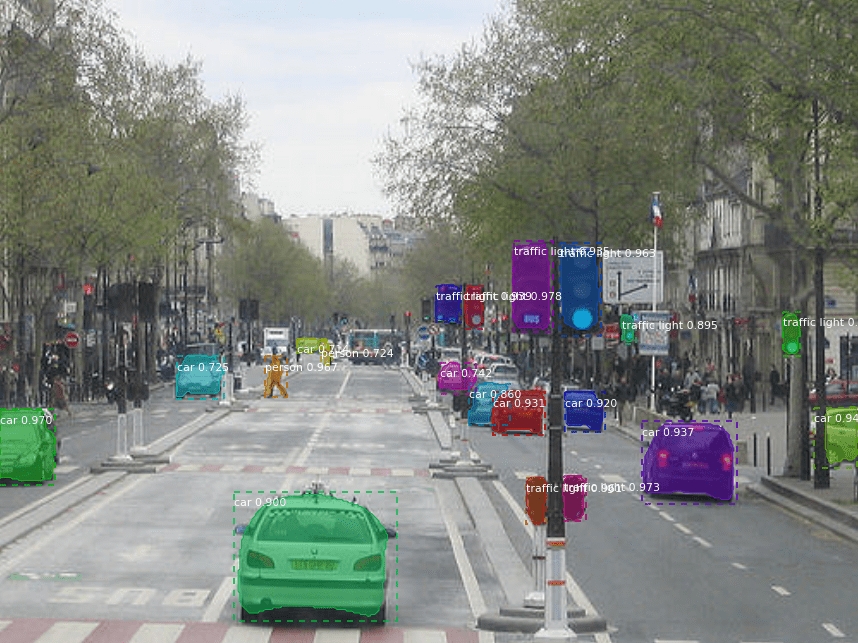
Mask R-CNN emerged as our second breakthrough. Mask R-CNN stands as a deep learning model engineered for object instance segmentation, extending the Faster R-CNN architecture. By combining object detection and instance segmentation tasks, Mask R-CNN aims to produce pixel-level masks for each object in an image, alongside bounding box predictions and class labels. This approach facilitates finer and more accurate segmentation of objects, surpassing the capabilities of traditional bounding box methods.
Why we dropped this approach?
In this approach, we needed masks only for the precipitate content present in the test tube. However, the Precipitate class wasn’t present in any of the pre-existing datasets like MS-COCO. We needed a dataset of precipitate and we could not find any. There weren’t much images over the internet. This is where we hit the barrier, both mental and real.
Third Approach – Transfer Learning / YOLOv5
We were in the dark, flying blind. There was no source and there was no destination. It was in that moment we knew we had to push the limit. We knew we needed accuracy in whatever we were about to do next. While we could tolerate an error rate of +1/-1 ml in volumetric calculations, anything beyond that was unacceptable, as each milliliter represented a significant fluctuation in protein percentage.
We opted for YOLOv5. We had no idea how accurate it is going to be, but we decided to keep moving forward, despite having fewer than 100 images at our disposal. Initial results seemed promising, but upon testing the model with real-world images, it often failed to detect our custom object. In order to determine if your machine learning or deep learning model is really working or not, you need to test the model on as many real-world images as possible. Failed detections indicated a bias in the trained model, likely due to the limited dataset. With very few images, our model ended up memorizing the training data rather than learning from it.
We knew there was no other way except somehow getting a dataset for our custom object. This is the inflexion point. The journey of MuscleBlaze ProCheck witnessed alteration in its path at this point. I clicked nearly 600 photos of test tube containing precipitate in different environments and lighting conditions. I emptied some amount of precipitate after some time in order to provide varying amount of precipitate images in the dataset. Multiple color protein powders were used in order to get different colored precipitate variants in the dataset. Once I was done with this, I applied multiple augmentations to each of those 600 images as shown:
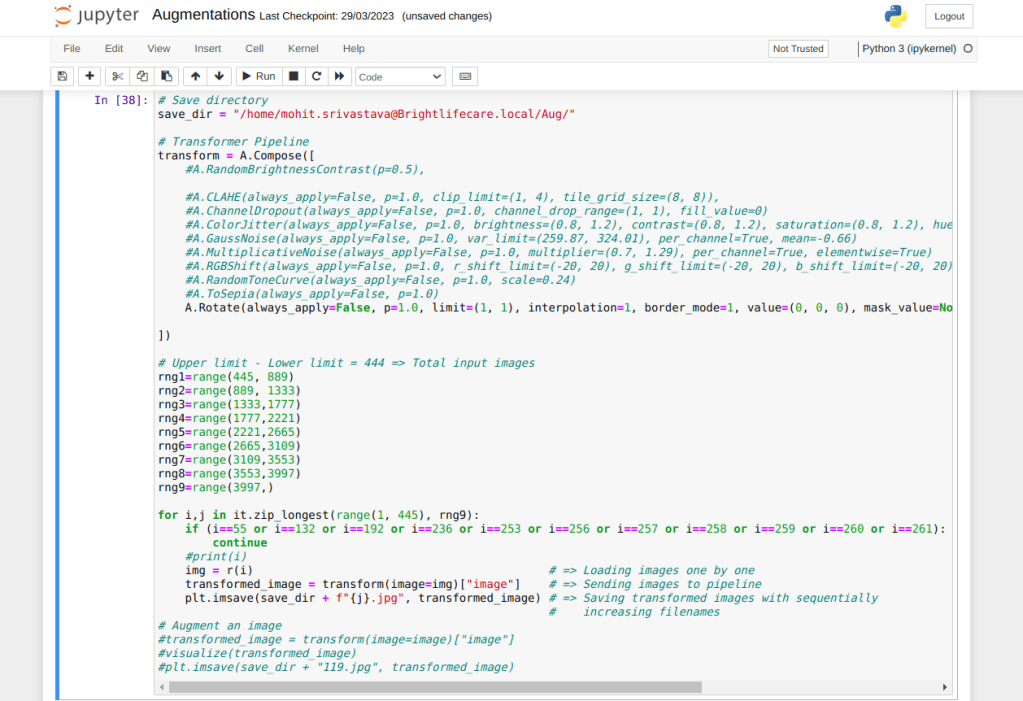
We went from 0 images to 9341 images in a week. We created what did not exist. This was crude power. Machine Learning craves for data. YOLOv5 uses Transfer Learning, which performs really well with data of the above-mentioned magnitude. We trained custom model specifically for detecting precipitate in a test tube using YOLOv5. Afterwards, we exported it to both .pt and .tflite formats for versatility and compatibility.
The End? Not Really!
The model was a significant success, capable of detecting precipitate regardless of the environment or protein variant. YOLOv5 offers an in-built crop function, enabling us to save only the cropped object from the full image. However, we still needed a method to calculate the amount of precipitate in the cropped image.
The test tube featured a linear scale printed on it. Although the scale displayed numeric values, they were in multiples of 5, posing a challenge for direct measurement. If the scale had displayed sequential numeric values, we could have simply detected the topmost numeric value in the cropped image to determine the amount of precipitate.
This means that if we deal with numbers, calculations could fail when values fall in between multiples of 5. Therefore, instead of using numbers, we opted to work with lines instead. What if we count the number of horizontal black lines? It would work, right? Absolutely!
We trained a model that was slightly biased towards detecting black horizontal lines due to the limited dataset and this bias worked in our favor. Our detection process now involves using two models: one for precipitate detection and another for detecting black horizontal lines within the cropped image generated from the precipitate detection phase. We then simply count the number of detections from the line detection model, which corresponds to the amount of precipitate present in the test tube. To further automate and enhance this process, we trained a custom model for test tube detection using TensorFlow 2.x
Android community somehow supports TensorFlow trained models better than YOLO models. The output tensor mismatches do not occur for TensorFlow models but they do for YOLO models somehow even though the format for both is .tflite. These are not exactly hidden issues; they are quite known by now to both Flutter and YOLO communities. We needed a way to implement live test tube detection, which by the way was not exactly possible officially. We needed some sort of trick.
“Live” implies a video stream. Video stream means a collection of frames. Each frame represents one instance of the live stream, i.e., an image. We came up with a solution: sending one frame every second to Kotlin/Swift modules for inference. Based on the presence of the test tube in that frame, we return true or false. If the test tube is present, we proceed with precipitate detection followed by line detection
Integration
The integration of TFlite models hasn’t been friendly at all. It has been one of the biggest roadblocks on the way. We tried running inference using a TFlite model in Flutter, but it failed due to Output Tensor format mismatch. After spending two to three weeks on back-to-back debugging and deep investigation, the issues kept coming in different vocabulary. We decided to change the method of integration. We tried Chaquopy next. It is a great thing, but it works for native code. We had it working on a native test app, but the app size jumped exponentially. We dropped Chaquopy.
When you cannot rely on device capabilities much, since not everyone has a high-end mobile device, and you don’t want to merge your Python code into the app code, the best way out is to use a server. Either you get your own server or use something like Google Cloud Functions or AWS Lambda, etc. We shifted our Python script to Google Cloud Function. It worked well in the testing phase. We used the PyTorch (.pt) models for both precipitate and line detections. Before moving to production, we deployed the Python script over our server. It works like a charm!
Outro
The accuracy of MB ProCheck at 99.XX% is truly remarkable! It is truly fascinating to witness what AI is capable of and even more fascinating to develop one. Let’s continue pushing the boundaries of AI and dominate the AI rush!
The above content is outcome our own experience while solving the problem in hand. Please feel free to drop in comments and suggestions and are mostly welcomed.
P.S. Please download our Muscleblaze App to check and experience the authenticity of Whey Protein.
